
• The Inspiration - "Where Did The Idea Come From?"
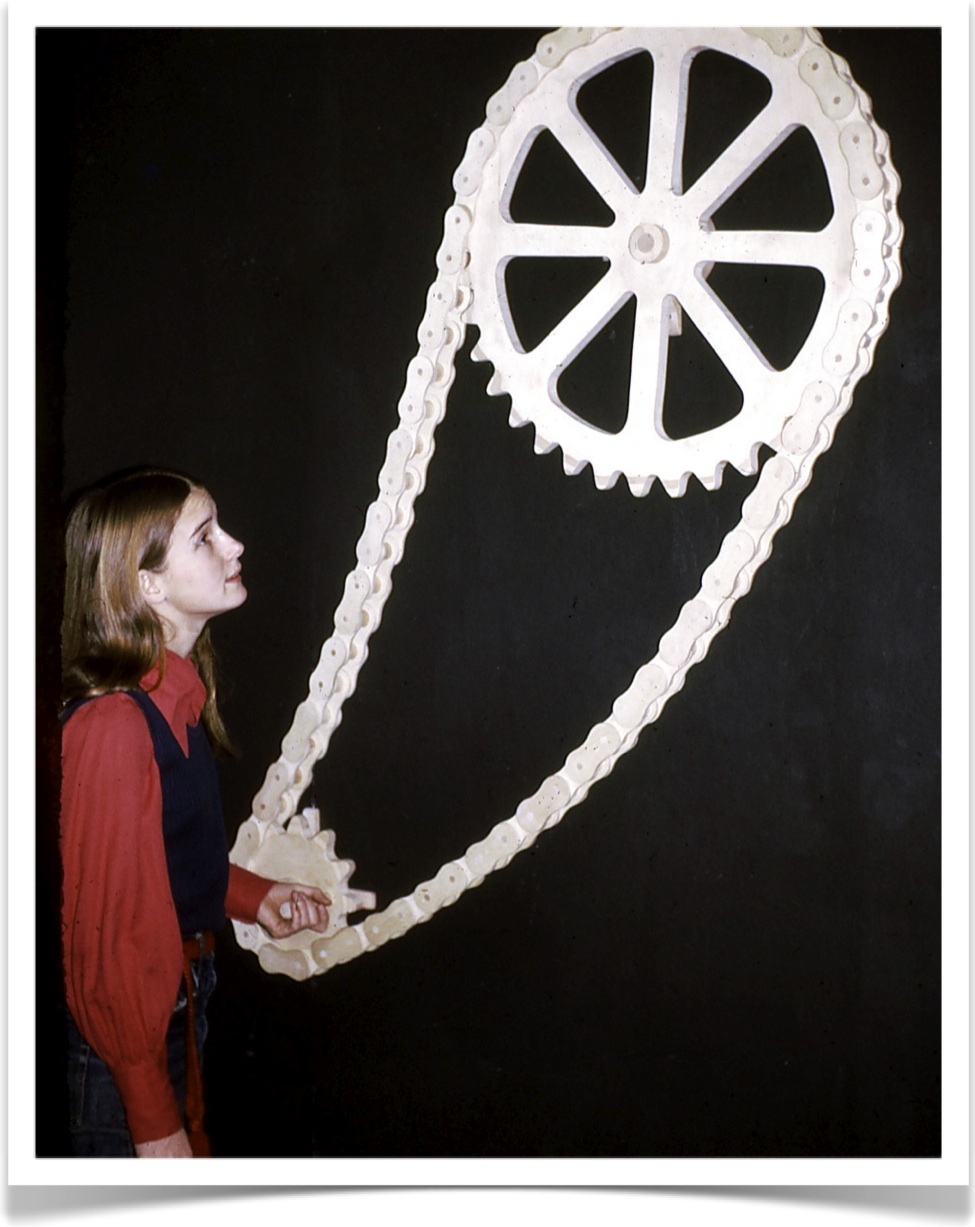
Marji, in 1973 with her bicycle chain sculpture.
I came late to the world of art. My early years were spent in the realm of science and engineering. My father was an engineer who worked on some of the early jet engines and we were both fascinated by the space program. It was the 60’s and every launch was a big event. I went to Boston University on an engineering scholarship and my dream was to become an inventor. Engineering led to chemistry and finally to physics as I found I had a general interest in a lot of subjects.
One of my best friends from high school was a sculpture major at Rhode Island School of Design in Providence. We started trading visits frequently and I was exposed to the artistic creative process from the inside for the first time. I was fascinated. I saw it as another type of creative problem solving, not all that different from my advanced physics courses but with a completely different goal.
One of Marji’s projects was a very large wooden chain and gear sculpture. It moved when you turned a crank. I was very excited by this piece, it showed me a side of art that was totally new to me. I had lots of ideas for other projects she should start but she just gave me one of her smiles and moved on to other projects.

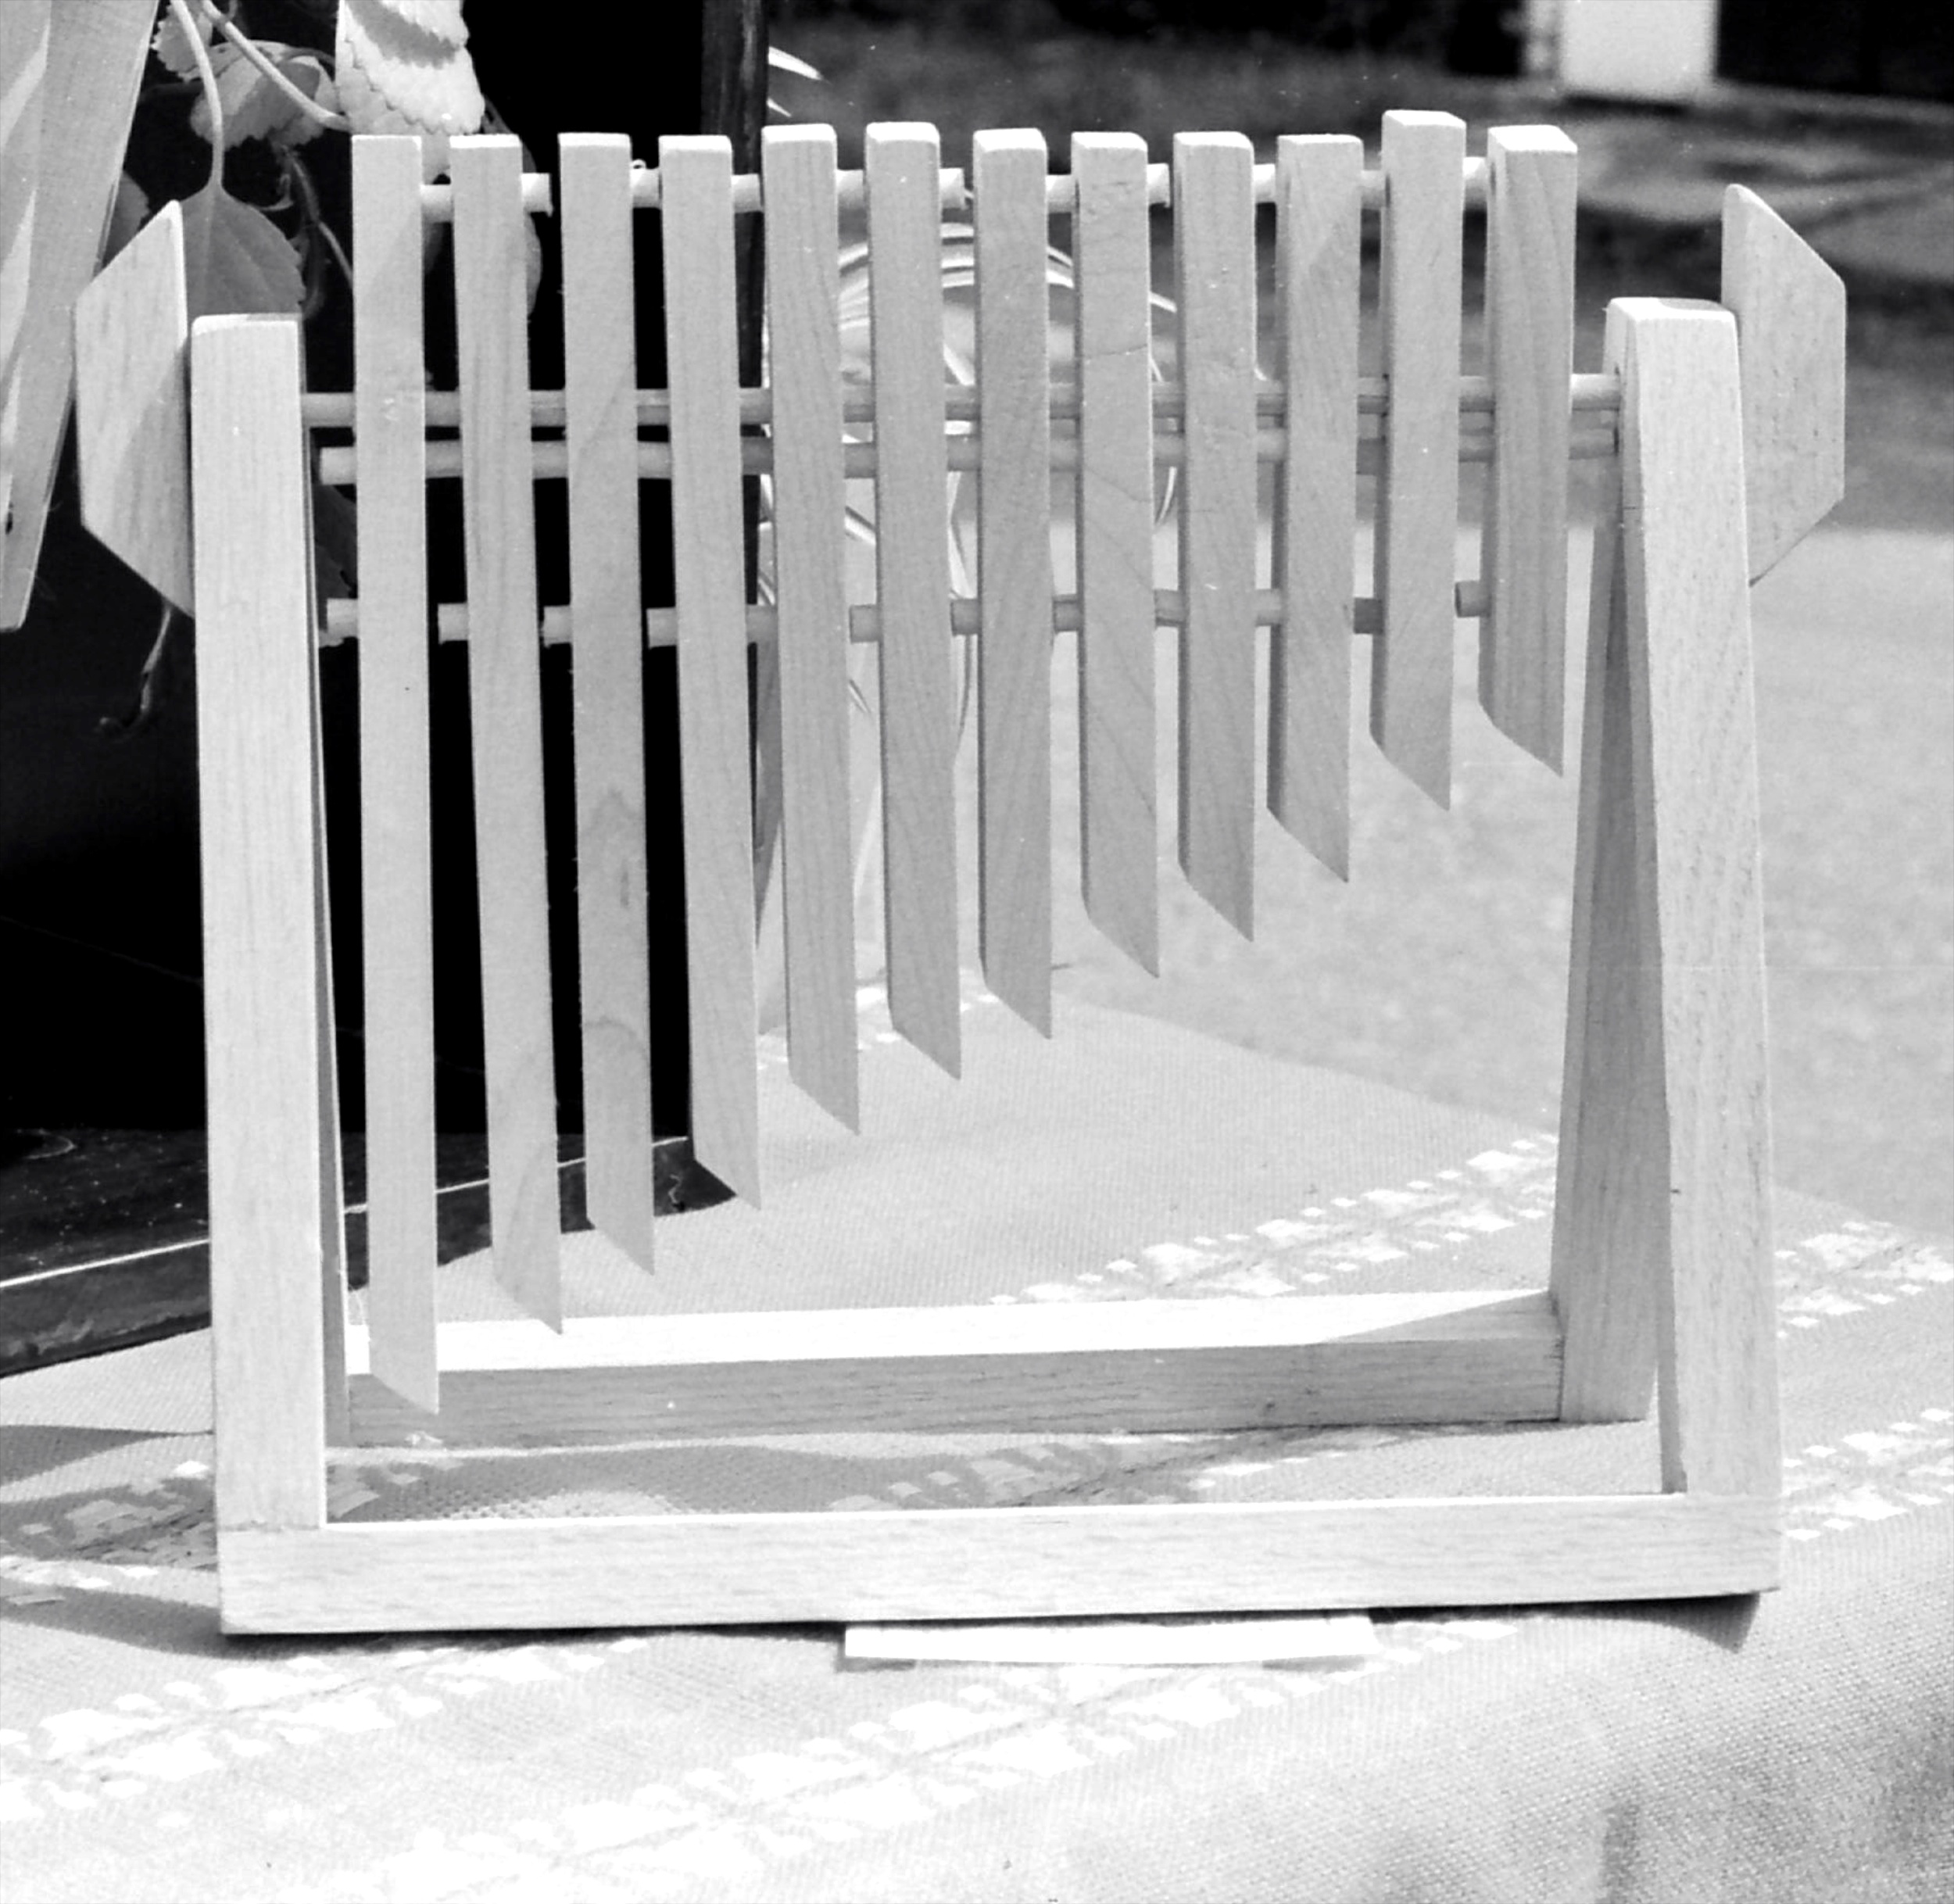
Another machine like sculpture by Marji - mechanical but static.
Part of learning to make art is learning to see in images. Marji’s sister and roommate had a black and white darkroom set up in their apartment and taught me how to use it. This fit right in with my physics and chemistry studies and I started trying to take and process interesting photos. I didn’t create anything to remember but I did learn to look at the world in a new way and began to think in images.
The exposure to art and photography started me seeing the world differently. To this day, I find art and science to be closely linked.
• Partnership - The Beginning
Shortly after college I married my best friend and art teacher. Marji and I have now (2012) been married for nearly 40 years and we're still learning from each other. We built a family, a house, and a few businesses together. There have been adventures along the way but fortunately, they have been the kind with happy endings.

• Learning Through Building
My first job out of college was as a database computer programmer. This was the era of stacks of cards and reams of green and white lined computer paper. The job was fairly boring with lots of dead time between submitting a “job” and getting the results. To fill the time I started doodling ideas for small toys that moved.
Marji’s first job was as an art teacher in a rural middle/high school. Our apartment was filled with the stuff of creativity including, eventually a primitive wood shop in the second bedroom. On my way home from work I could detour to a large wood shop with a dumpster full of wonderful wood scraps. I started building some of my doodles and eventually decided to try selling them at a local craft show. To my delight and surprise they sold.
Marji loved her job. I didn’t feel the same about mine. I left after about 9 months so I could explore my toy ideas more fully. We found an apartment in half of an old farm house where the real attraction was the abandoned milk house out back. It would make a fine first workshop. Marji would continue her job and support us and I’d try my hand at full time creative problem solving with kinetic wooden toys as the goal.

Spclacker (1975)
Xylo (early version - 1975)
The only piece we still have is a working example of a later version of Xylo.
This was the mid 1970’s and the toys sold fairly well via the regional craft show circuit, but I quickly realized that to make a living I was going to have to build far more of these kinetic toys than one person could manage. We didn’t have the money or inclination to hire people and set up a production line business. There didn't seem to be much of a future but I was enjoying myself and I figured there were plenty of years ahead to work a "real job".
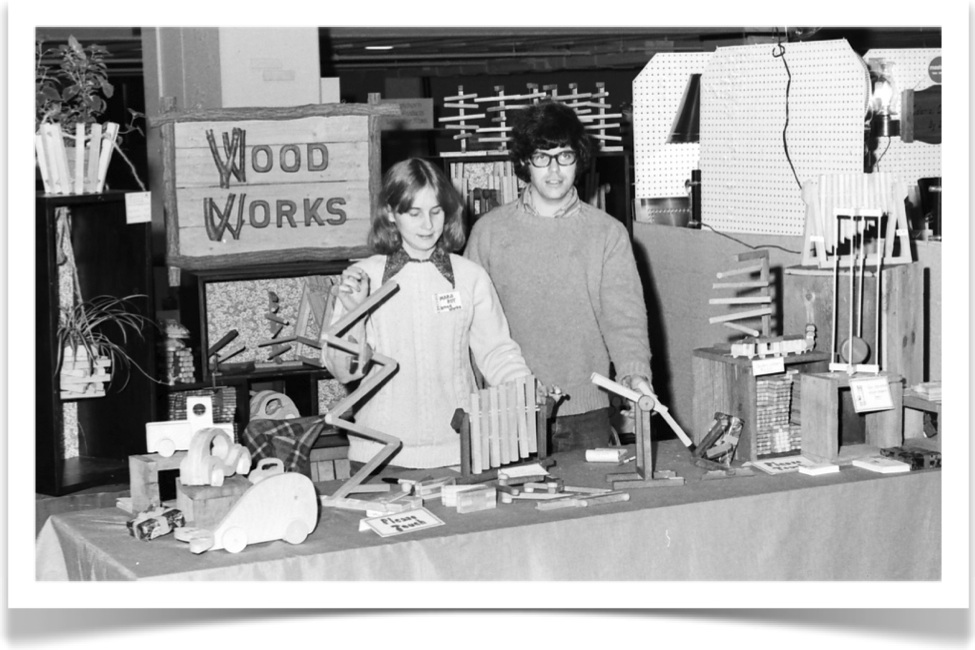
Showing the toys at a Hartford Civic Center craft fair (c 1975)

Our display of 'executive playthings' at the Wickford Art Show (c 1976)
• Inspiration - Kinetic Wall Sculptures
Sitting at a craft show constantly twirling and spinning toys to keep them in motion led to dreams of longer running pieces. There was also the constant refrain from customers, "Can you make it run longer?", which contributed to the thought process of a kinetic sculpture but the real impetus was something else. The producer of a local TV station's children's show came by and asked if I could make something that moved for a show set and I started looking at the run-time challenge seriously. The TV deal never materialized but I continued working on the problem.
The first idea was to build a large wooden machine that would run for a "long" time. I decided it should be weight driven so that I wouldn't have to deal with power cords and electric motors. My first “kinetic sculpture” was a 6 foot tall freestanding monster that hardly moved and ran for all of 20 minutes powered by a 15 pound weight. But it moved and that was all that mattered. We named it Albert. The only reason for the name is that it started with an "A" and we didn't know anyone with that name.
Most of Albert was a supporting base. I decided to change orientation and instead mount a sculpture on the wall to simplify the construction. My first wall piece was called B.W. Cornwallis. The only reason for the name is that it started with a B. (Naming sculptures has always been a challenge but we have gotten better over the years.)
B.W. had a rolling wheel on a rotating frame. It worked reasonably well but was finicky. Of course all that really mattered was that it ran for 20 minutes with less than a pound of weight as the power source. But more than the motion was the inspiration. B.W. was only the begining and an intense design year followed.
• 1976 Was A Good Year
The first kinetic wall sculpture, B.W. Cornwallis just started the ball rolling. It was followed by a flood of new ideas as I began exploring the possibilities.
The videos below showing the sculptures are organized in the order of creation (as I remember them) following the creation of B.W.Cornwallis. Keep in mind that I worked on lots of different pieces at the same time, trying, failing, trying again so the exact sequence is a bit hazy. I am sure about the first three, B.W Cornwallis, Inventor Released and Serendipity.
Inventor Released was my first successful wall mounted kinetic sculpture. It is a simple piece producing a simple, repeating motion but it opened the door to a 40+ year career designing and building kinetic sculptures.
Serendipity was the third wall sculpture in the series. In this piece I used a rolling wheel rather than the rotating wheel I used in my breakthrough piece, Inventor Released. The escapement is the same concept but with a different arrangement of parts. I was trying for a more efficient and longer running sculpture with a more interesting motion.
I experimented with lots of different ways to use a descending weight to rotate a wheel. Crazy Eight was one of the more reliable ideas because the wheel rotation is always powered, first in one direction and then the other. I still use this concept in some of my sculptures many years later although they are a bit more refined.
Wandering Asterisk was one of the more inefficient designs to both build and run but it is certainly entertaining to watch.
As you can tell by watching the videos, all of my early kinetic sculptures were quite noisy. Although fascinating to watch, they were rather difficult to live with. Anticipation was my first nearly silent design and it started a career-long obsession with controlling the sound of my sculptures.
Tri-Star is the seventh kinetic sculpture I designed in the breakthrough year of 1976. It is a return to the quad hook mechanism I designed for Wandering Asterisk but with a better winding mechanism and a more efficient design.
Double Daisy was the final sculpture of of 1976 but unfortunatly I couldn't find a copy to photograph and make a video. It used a quad hook mechanism that "walked" between 2 rotating wheels. It ran very quickly and had a short run time but produced an interesting pattern. I used the same basic quad hook mechanism in Wandering Asterisk, Tri-Star and Double Daisy. I really wanted to find a way to make it more efficient but never succeeded.
The year closed with a noticable change in Wood That Works. The product line was shifting rapidly away from motion toys and into kinetic sculptures. We began to see the possibility of earning a living making kinetic sculptures.
• 1977 Rhinebeck Craft Show - Earning A Living

Marji and I started showing the kinetic toys at local craft shows in 1975. It was a great way to get feed back from all types of people and to earn a little money. Unfortunately it was a very hard way to actually earn a living. So much time was devoted to travel, set up and break down that there wasn't enough time for me to design and build new ideas.
Luckily for us, the first wholesale craft market started at Rhinebeck, NY in 1973 and by the time we were starting out in 1975 the Northeast Craft Fair was a dynamic and growing show. We applied for the 1976 show in late 1975 using photos of the kinetic toys and we were rejected. This was one of those experiences that seemed bad at the time but was actually a good thing. Rather than being tied down to making hundreds of toys to fill wholesale orders, I had a breakthrough year, conceiving of and building 8 completely new wall mounted kinetic sculptures. We applied for the 1977 show the next year with the sculpture photos and were accepted. This was a major turning point in my career as an artist, or more correctly it is when I started having a career as an artist.

Up until this show I thought I’d have to eventually get a “real” job so I could earn a living. The Rhinebeck show completely changed that. This show introduced my work to hundreds of craft galleries that were part of the newly rejuvenated American craft movement. They were hungry for new creative work and we had something no one had seen before.
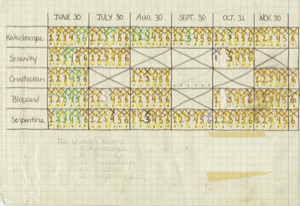
We had done quite a few local shows by the time Rhinebeck rolled around and thought we knew what we were doing. How wrong! Marji wasn't able to attend the first day of the show because school was still in session. My college roommate Larry volunteered to come and help until Marji could make it. Good thing he did. The first two days of the show was limited to wholesale customers only but even so they were lined up asking questions and placing orders. About an hour into the show Larry looked at me and asked, "How many sculptures can you make and when can you deliver them?" I made some guesses and Larry drew up the first production chart, a concept we still use today.
The weeks that followed were filled with setting up a "real" business. We bought a typewriter, a filing cabinet, bookkeeping paper, and enlisted family help in setting up accounting and filing systems. I had to figure out how to pack and ship the sculptures and we needed written directions so that anyone could set them up. Luckily Marji was on summer break from school but I think there were more hours in a day when we were younger!
• Shop/Studio

My first official studio in Woodstock, CT! c 1976
My first shop was in the second bedroom of our small 2 bedroom apartment. It was a poor shop at best! I am sure the downstairs neighbor thought so as well. Our search for a rental with some kind of shop/studio possibilities was not going well. It was pure chance that a good solution came our way. My mother was working at an art museum located on the local university campus. One day, while the museum was closed, an older woman showed up at her desk. No one was quite sure how she got in but it was lucky she did. She was looking for someone to rent half of an old farm house. There was a "milk house" out back that she thought might make a good art studio so she had come to the art museum looking for an artist to fix up the studio and live in the apartment. Lucky us!
It was a small 12’ x 12’ building that had a decent roof. It was my first “real” shop. We used salvaged wood to build a work bench and shelves. I bought a drill press and router. We borrowed Marji’s grandfather’s bandsaw. I had my father’s old table saw and converted it to a disk sander.

It was very cold working here!
The shop was as crowded as it sounds. To make things just a bit more exciting I heated it in the winter with a homemade wood stove! I had to time projects between when I had heat and when I made dust! It was cold in the winter and hot in the summer but I considered it a fine place to work. But not for long. When I started building sculptures to fill the orders we had taken at Rhinebeck it quickly became evident that I needed a bigger place to work.
Marji liked houses and building. We spent the first years of our marriage looking at land hoping to build some day. Most of what we could afford was either swamp or cornfield. We had pretty much given up when Marji’s father heard about a piece of raw land in Ashford, Connecticut. It was heavily wooded and filled with underbrush but had a south facing hillside. It was expensive for what we could afford and of course we had no credit yet. (You had to be 25 to get a credit card!) Luckily the seller was willing to take payment in 3 installments.

The right wing of our house was my next studio.
At the time of the 1977 June "Rhinebeck" , (Northeast Craft Fair) we had one more payment due January 1 of 1978. With the successful show we made the payment on time and started planning the new shop/house.
Marji worked on plans for the structure. Her father helped with engineering and was our carpentry teacher.
We cleared a building lot and access driveway in early 1978. When the land was dry enough we hired someone to dig the foundation hole and grade the driveway. The foundation was set by early June and we started framing. The next 6 months were intense, working on the house from 7 AM till 3 PM and then in the shop until 9 or 10 PM at night. We were extremely fortunate to have a gallery in Honolulu that was selling everything I could send them and basically gave us a blanket order. We didn’t have to do any shows and just kept our heads down working. It’s nice to be young!

Wood That Works moved into its own building in 1992.
My new workshop was in the wing and consisted of greatly expanded space including a display area and design office. I worked there for 14 years.
In 1992 Marji and I decided it was time for me to move out of the house. We needed the space for a growing family. We owned a piece of adjacent land and Marji designed another "house" to fit on it. This one would have a larger shop, separate finishing room and a gallery. I cleared the land but we hired a local builder to put the structure up. Building one house in a lifetime is enough!
It is to this shop that I still "commute" everyday. The commute is a 2 minute walk along a woodland path regularly shared with the local deer population.
• It's Not The Mechanism - It's The Motion!
During the period 1976 to 1978 I was consumed with discovering and creating new mechanisms that moved a simple wheel back and forth. The interesting part of the sculpture was how the mechanism worked.
1979 marked a turning point. I had developed a sufficient understanding of mechanism design. The new challenge was to use that knowledge to produce pieces with more complex and unpredictable motion. The sculptures from 1979 clearly mark this change in design direction.
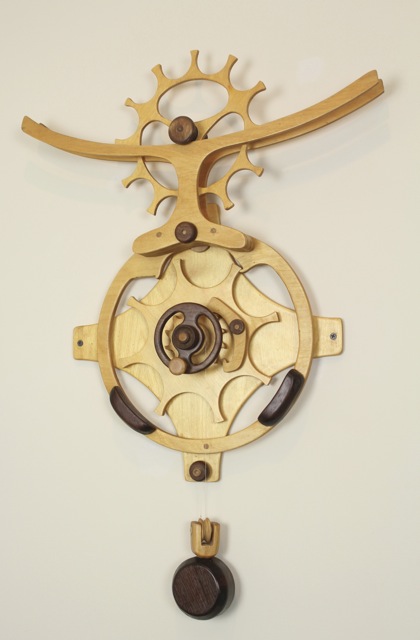
Kaleidoscope is the first sculpture I designed to create an optical moiré pattern. To give the viewer time to recognize the moiré pattern, the wheels had to counter rotate for several revolutions at the same rate of speed. To give the eye a rest and to create a second pattern, the wheels had to slowly stop and then reverse direction. The drive mechanism to do this was totally new but it was based on a concept I learned in making the 1976 sculpture Anticipation.
Serpentine is my first completely unpredictable sculpture. (I can't say "random" because technically a machine can't produce truly random motion. I learned that on the Internet!) The patterning part is a powered double pendulum. I had played with this type of motion in some of my first hand driven kinetic toys but figuring out a mechanism to drive the motion was a challenge. The wheels had to be free to rotate most of the time with just an occasional push when they started to slow down. None of my prior mechanisms could do this so I had to design something completely new.
Blizzard is an attempt to produce unpredictable optical pattern sequences. I was looking for a melding of the optical pattern idea in Kaleidoscope with the unpredictable nature of Serpentine. My solution was to drive each wheel with its own mechanism that runs at a slightly different speed.
I continued designing patterning sculpures with desending weights for several more years. It wasn't motion that inspired the next shift but a change in power source.
• Children • Toys • Springs!
At about the time our second daughter was born in 1982 we were approached by a toy company representative. He was looking for new ideas and had seen my wall pieces. Would we be interested in trying our hand at licensed toy design? We had all kinds of ideas along with young children as a built in testing department. It seemed like a great idea.
The first piece we design together was called Bicycling Bear. It's a nice piece but proved too expensive to manufacture for the mass market toy business. By the time we understood that, it no longer mattered. Marji was inspired and became the driving force behind our collaboration on dozens of young children's toy ideas. We ended up licensing quite a few.

What followed was an exciting and frustrating period of ideas, promises, contracts, patents and lawyers. Marji and I had fun designing and testing toys with our kids. Our kids enjoyed business trips to toy stores. We did not enjoy the cheap plastic end results of our designs or the constant legal wrangling and as our children got older we gave it up. But we had learned and I brought back one very significant discovery to my scupture design.

During a meeting with the technical department of a toy company I learned about constant force springs. One of the designers was playing with a coil of metal. He described it as a constant force spring. This was something totally new to me but something that made so much sense. I bought some samples and started figuring out how to use them in my sculptures.

It was clear that this was a much better solution that would impact future design.
• Constant Force Springs - New Challenges
Constant force springs have the same qualities as a weight drive, that is almost constant torque over the full wind of the spring. They are small and can be incorporated just about anywhere in a sculpture. No longer would I have to think about a weight drop path or design complicated pulley and string suspension systems. Soon after learning about them, I started using the springs and never looked back.
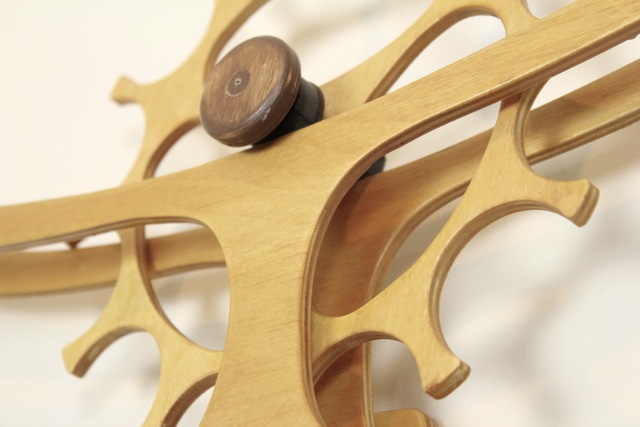
The springs opened up another world of things to try. I made small freestanding pieces, like Dyad and wall pieces like Tapestry. Every design now incorporated a spring and in all of these pieces I was able to reduce the mechanism and feature the motion, furthering my design evolution away from a mechanism focus to one of creating motion patterns.

• Tools & Techniques • Technological Evolution
The tools in my shop/studio include drill presses, bandsaw, routers, jigsaw, sanders and a collection of hand and hand power tools. They haven't changed much over the years although I am always developing creative ways to use them for constructing kinetic sculptures. The unique feature of my current shop is a long blank wall for testing multiple sculptures simultaneously. With features like the large testing wall my shop has evolved into a very specialized place that only works really well for building sculptures.
My design tools have changed quite dramatically in the past 40+ years. Initially I sketched in a notebook and drew finalized drawings on a drafting board. I would take the full size drawings to the shop, glue them to a piece of wood and cut them out with a bandsaw. Any changes literally meant "back to the drawing board." I ended up making a lot of changes by just sketching them on a new piece of wood and reshaping them with a sander.
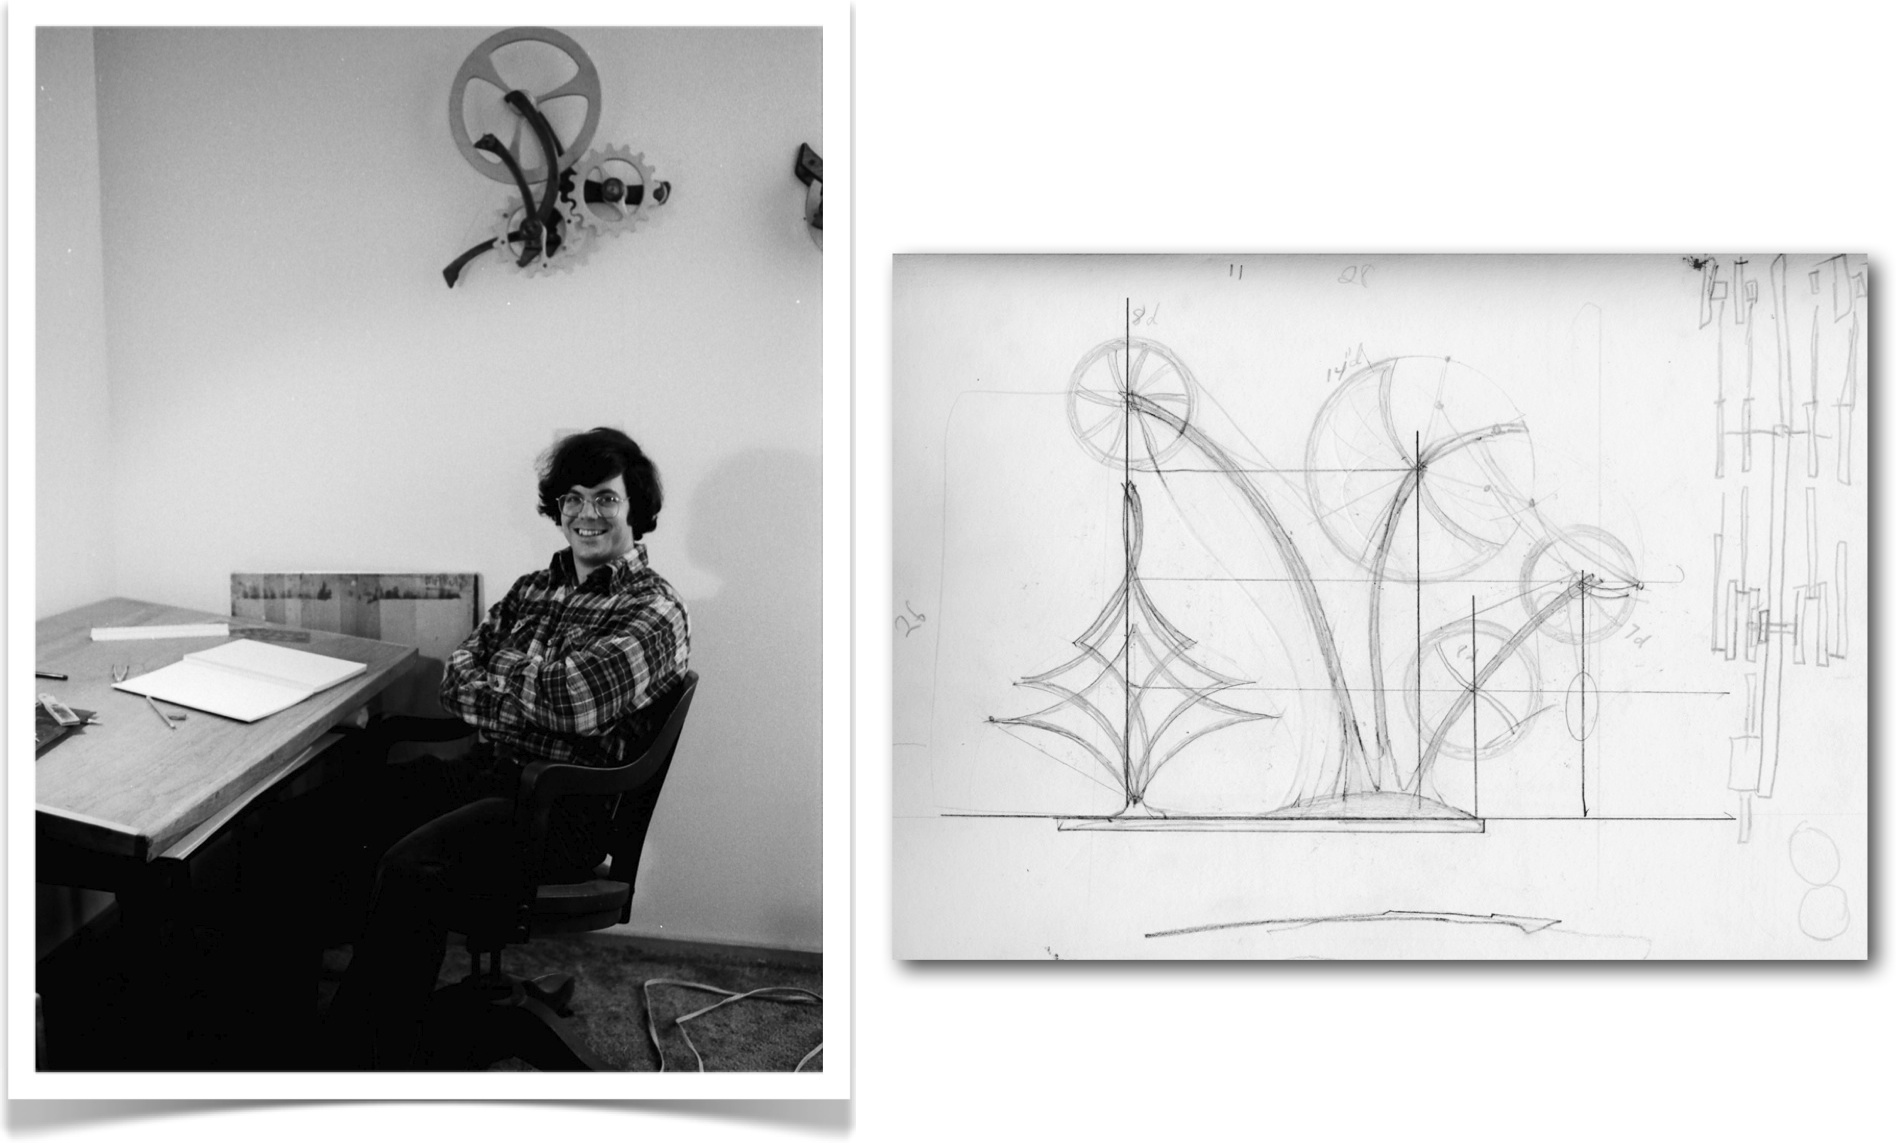
This began to change in 1986 when I started drawing using a Macintosh computer. I used a number of early drawing programs but settled on Adobe Illustrator when we acquired a LaserWriter printer.
With this combination I was able to create my drawings, scale them up to full size and print them by tiling together a number of pages. I glued the drawing to a piece of wood and cut it with a band or jig saw. This system had a huge advantage when it came to making changes. I could just tweak the original computer drawing and reprint it. It took a while to get comfortable drawing with a mouse and using bezier curves as the primary drawing tool but it is a very powerful and flexible way to create the curved shapes I have come to prefer.

I used that method for many years. The hardware and software got better and faster but the procedure was the same. The big change happened about 5 years ago when I got access to a large computer controlled cutting machine at a local wood shop. All the work I used to do with a bandsaw and jig saw I now have done using this tool. I create very precise drawings in Adobe Illustrator and convert them to a special form that the cutting machine can understand. The machine is far more accurate than I can be cutting on a bandsaw and has the added benefit of being able to cut shapes that were impossible for me to cut with older power tools.
The computer has proven a wonderful tool for drawing and cutting the forms I use but also for the important task of visualizing new shapes and patterns in motion. I can link the Illustrator drawings of individual parts together in an animation application called After Effects. I then use some simple programming to set them in motion. This enables me to quickly iterate through many changes and see how the motion patterns evolve.
I also use several other applications when desiging. To visualize freestanding sculptures I create full 3D drawings and animations using a program called Strata Design 3D. This program was indispensable for the large and complex drawings needed for Silver Symphony. This piece was complex to build and I wanted it know how it would look before I started. I use Working Model to compute the balance points of complex systems of parts where balance is critical as in a scupture like Frolic.

I enjoy both the mental process of thinking about and drawing designs for sculptures and the physical process of actually building them. I work alone because I want the freedom to mix these tasks at my discretion. This severely limits the number of sculptures I can build but I believe also makes each of them a bit better.